React 19: Exploring New React Hooks and Actions
Introduction
“React” is a JavaScript library developed by Facebook for building user interfaces. ReactJS is one of the most popular UI libraries in the front-end development world. It enhances the interactive and dynamic features of web applications. React follows a component-based approach. This allows developers to build an application using components, which are the building blocks of the user interface. React operates on a virtual DOM (Document Object Model), which enhances performance. In addition, it promotes a unidirectional data flow structure, making the code more readable and manageable. We will share the innovations (hooks, actions, etc.) that come with React 19, now. Therefore, you can start trying these features and see what has changed in React 19.
Table of Contents
useActionState
useActionState is a React 19 hook designed specifically for managing asynchronous operations. It’s commonly used for tasks like form submissions, API calls, etc. This hook facilitates easy management of the various states that occur during the operation, such as errors or whether the operation is still in progress. It also provides a function to trigger the operation.
For example, you have a form to update a username, and this operation happens asynchronously. Then, you can use the useActionState hook to manage this operation. This hook tracks the operation’s state during execution (error, success, etc.) and provides a function to trigger the operation.
As shown in the code example, useActionState returns an array. This array contains three elements:
- error (the error state),
- submitAction (a function used to trigger the operation),
- isPending (a flag indicating whether the operation is in progress).
This enables providing appropriate feedback to the user during the operation, ensuring smooth updating of the interface. Particularly, visual feedback, such as displaying a loading indicator while the operation is ongoing, can be provided to the user. Also, the button that triggers the operation can be disabled during this time.
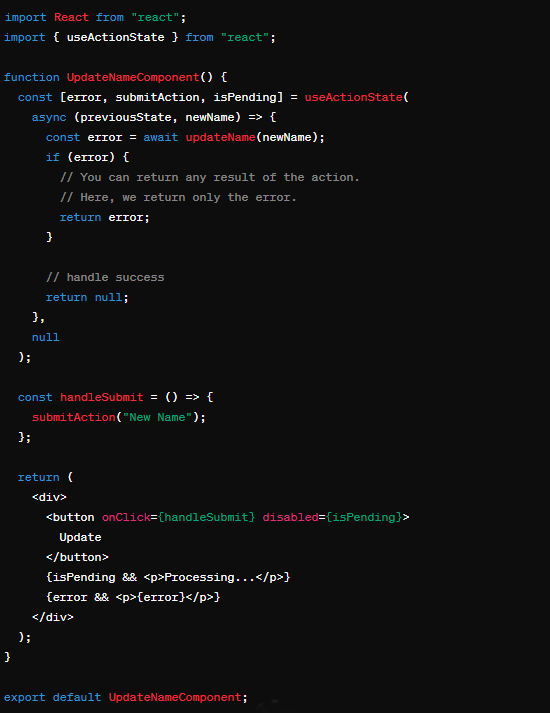
In this example, there’s a simple component that initiates an operation. useActionState takes a function representing an operation, typically an asynchronous one. If any error occurs during the operation, it assigns to the error variable. Once the operation completes, the isPending variable determines whether the operation is still ongoing.
In the component, clicking the button triggers the call to the submitAction function, initiating the asynchronous operation. While this process is ongoing, the button’s interaction is disabled (when isPending is true), preventing the user from initiating the same operation multiple times. After the operation completes, any error is displayed to the user.
useTransition
useTransition is a React Hook that enables you to update the state without blocking the user interface. This feature helps make transitions in the interface smoother when initiating asynchronous operations. Particularly, it helps to display a transition indicator when a process begins. This indicates to the user that the process is still ongoing and the page is not frozen.

In this example, there’s a component that toggles a message open and closed. The useTransition hook wraps the toggleMessage function, which is used to change the visibility of the message. Every time the user clicks the button, the toggleMessage function is invoked. And while the operation is ongoing, the isPending value is set to true. This ensures that the user doesn’t click the button again, maintaining smooth transitions in the interface.
This part explains the process of ensuring that the user doesn’t click the button again and maintaining smooth transitions in the interface. When an asynchronous operation occurs and the user initiates an action, there might not be an immediate change in the interface. For instance, when you click a button, and a background task is initiated, the user shouldn’t click the button again. This is because the operation hasn’t finished yet, and clicking again would be unnecessary.
The useTransition hook handles such scenarios. This hook provides a signaling mechanism when an operation starts and completes. When the operation starts, the isPending value is set to true. It indicates that the user typically waits for the operation to complete, during which interactive elements like buttons are often disabled. When the operation completes, the isPending value is set to false. It signals to the user that they are ready to initiate a new action. In this manner, the user experiences a smooth interface because interactive elements don’t unexpectedly disable. Visual feedback provides an indication of waiting for operations to complete. This ensures that transitions in the interface remain smooth. It means the interface doesn’t freeze, and the user doesn’t have to wait for actions to start.
useFormStatus
useFormStatus is a new hook in React DOM. It is often utilized when designing components that need access to information within a form in design systems. It helps to access information like the form’s state without passing it down as props to the components. Typically, this could be achieved using Context. However, the introduction of the useFormStatus hook makes this process simpler.
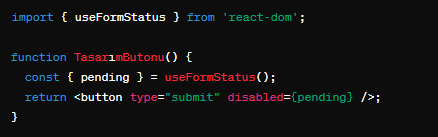
useFormStatus behaves like a Context provider. It reads the state of its parent <form> element and re-rendering whenever any changes occur within it.
For example, when a user submits a form, useFormStatus captures the form’s state (e.g., whether it’s in a “pending” state or “submitting” state). Then it updates the behavior of the component accordingly. This can be quite useful in scenarios where monitoring the form’s state and enabling/disabling components based on that state is necessary.
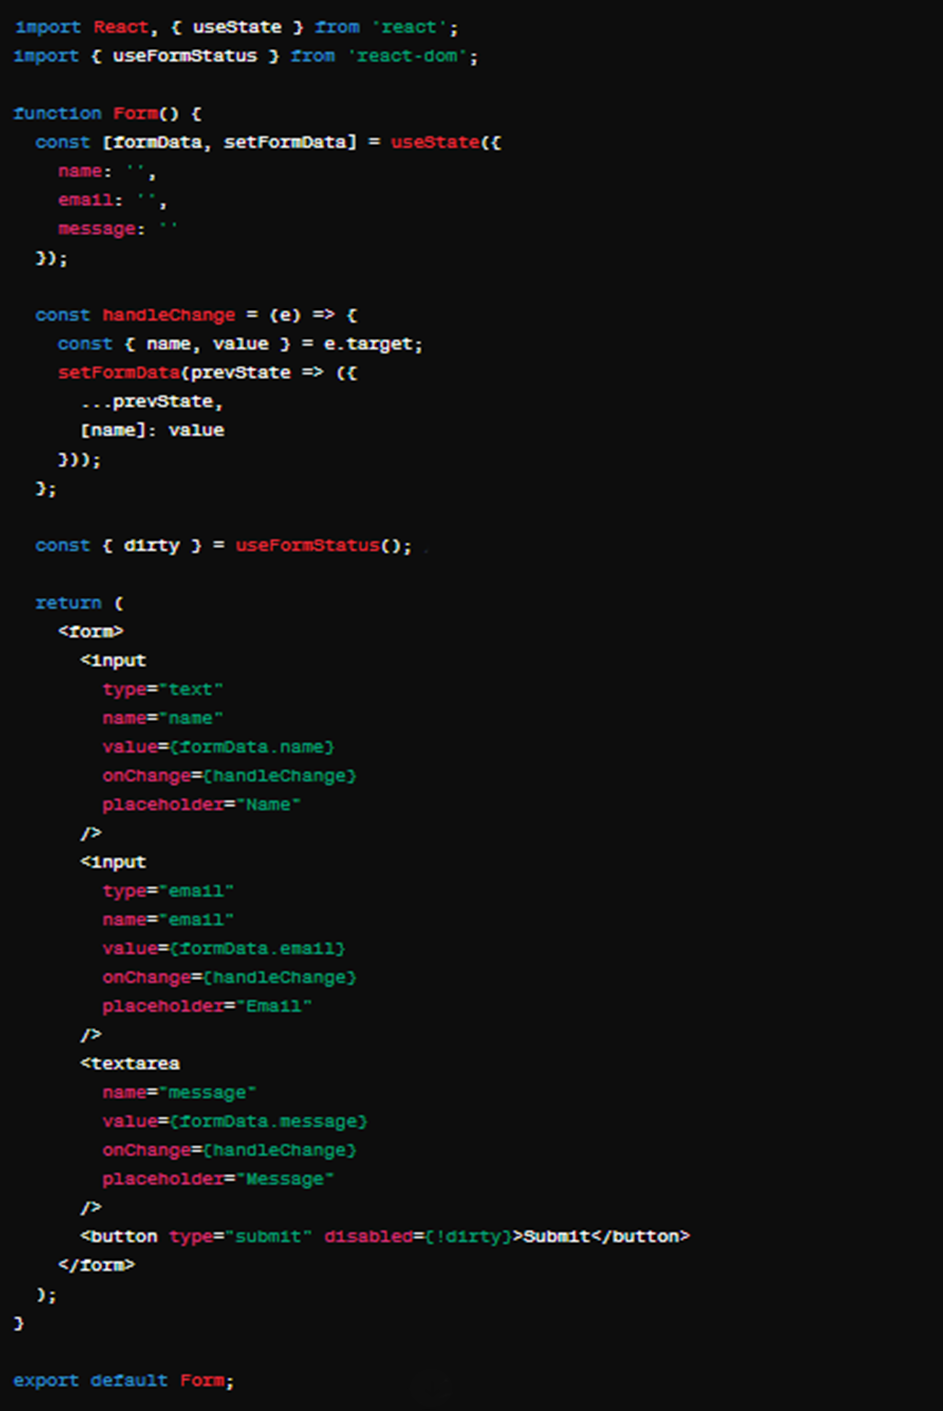
In the following example, let’s say you have a form with a submit button. The useFormStatus hook enables enabling/disabling the submit button based on form completion.
We’re using the useFormStatus hook to check if the form is filled out. The dirty property indicates whether the form is filled out. If the form is filled out, meaning at least one field has been modified, the submit button will be enabled. Otherwise, it will be disabled. This provides useful feedback to encourage the user to fill out the form.
useOptimistic
A new React 19 hook is useOptimistic. This hook facilitates optimistic rendering of the final state while data mutations are being performed and asynchronous requests are still ongoing.
For instance, consider a scenario where a user changes their name. Displaying the new name instantly on the interface while asynchronously sending the request to the server can make the waiting period more pleasant. useOptimistic can handle such scenarios.
For example, let’s say here is a form where a user changes their name. After entering the new name, immediately displaying this new name and then automatically reverting to the old name when the update process is completed or an error is encountered can be achieved. This is a feature that enhances the user experience.
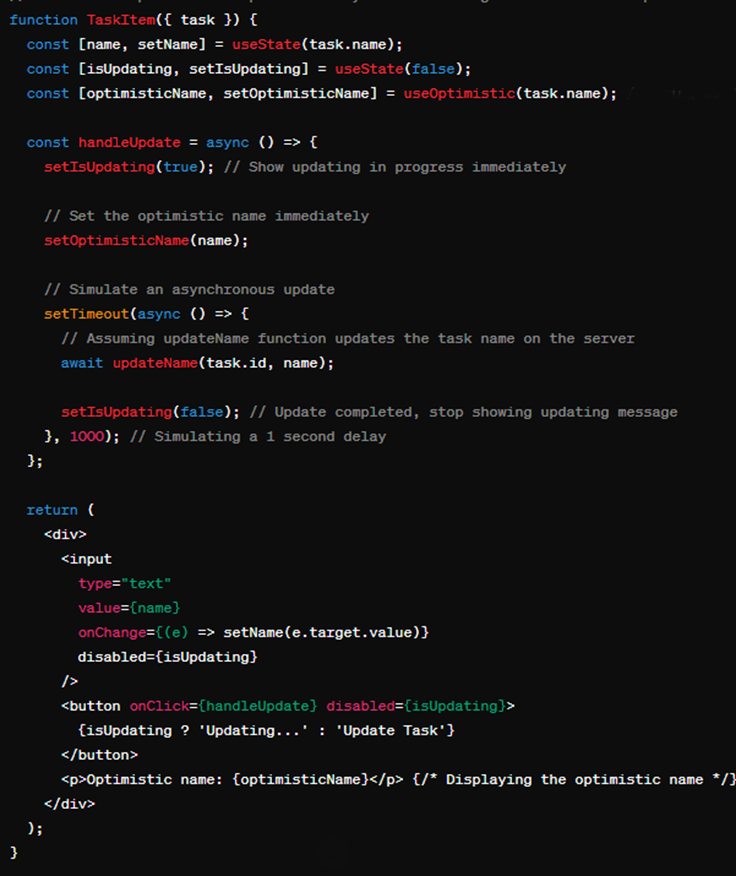
Now, we’re updating the optimisticName state using the useOptimistic hook. This allows the user to receive immediate feedback, and the UI updates optimistically. For example, when the user changes their username, this change is immediately displayed in the UI. then when the asynchronous update is completed, the UI is automatically updated.
use API
The “use” API is an API to handle asynchronous data processing in React components. This API allows components to manage asynchronous operations internally. Also, it helps to utilize the result of the operation in rendering the component.
When an asynchronous operation starts, the “use” API waits for the result of this operation. And it returns it when the operation finishes. This enables data to be used directly within the component when it arrives. Thereby components become more dynamic and interactive.
For example, the “use” API performs an asynchronous operation within a component. Also, it ensures that the component is rendered based on the result of this operation.
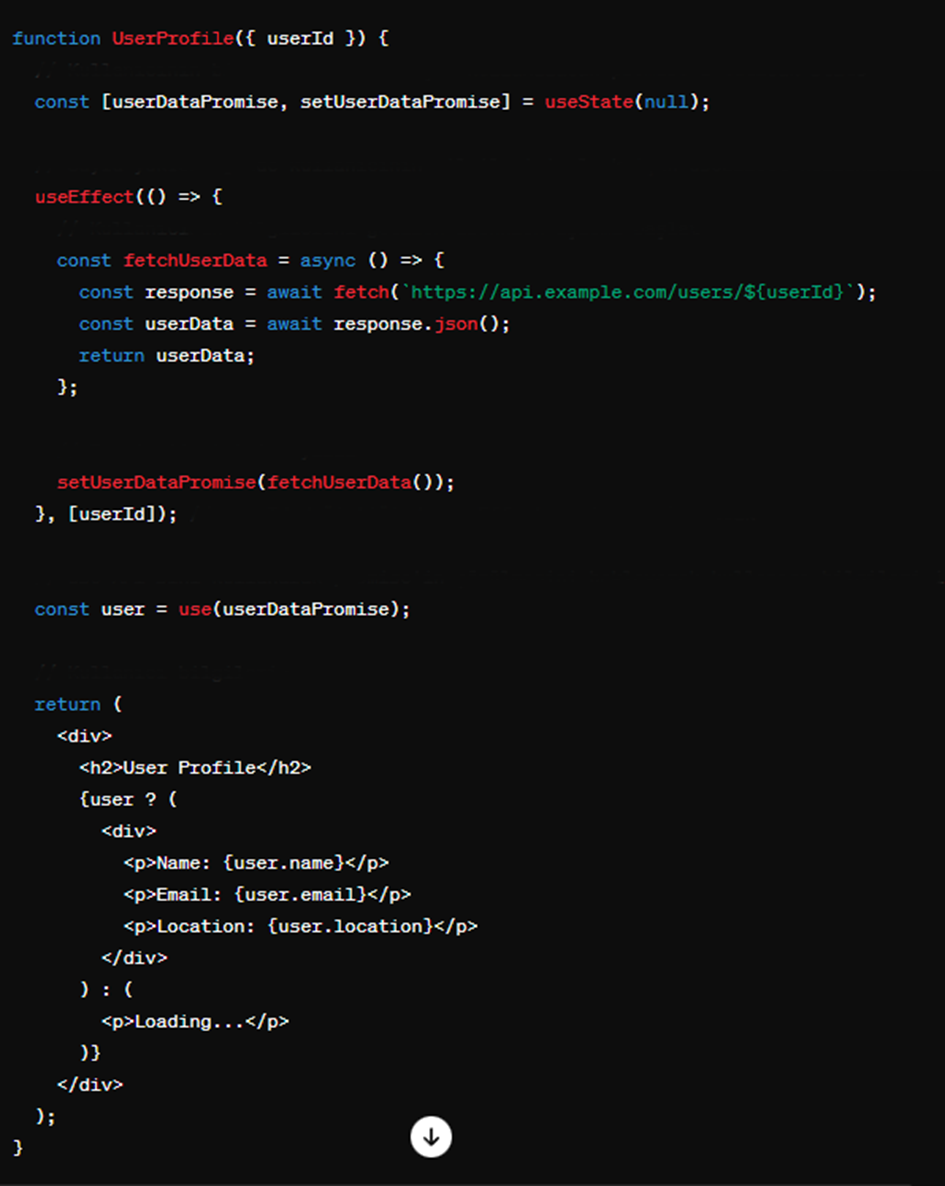
In the example above, we have a component called “UserProfile”. It makes an asynchronous request to an API to fetch user information. We then update the content of the component using the data received from this request.
We define a state called userDataPromise using useState. This holds the promise of the asynchronous operation that fetches the user’s information. Using the useEffect hook, we initiate the asynchronous operation to fetch the user’s information when the component is mounted or when the userId prop changes.
Using the use API, we wait for the resolution of the promise named userDataPromise. Once the promise is resolved, we assign the user information to the user variable and render it. If the user information is still loading, we display the text “Loading…” on the screen.
This way, you can easily manage asynchronous operations with the “use” API. Then you can create your components in a more organized manner.
useDeferredValue
The useDeferredValue hook is a feature by React to delay a value and update it in an optimized manner in the background. It’s particularly useful in situations requiring intensive processing, such as dynamic data. This is important for running the user interface smoothly and without freezing.
For example, let’s consider a search component. When a user enters a search query, you’d want to fetch and display the results based on that query. However, the user can quickly change the search query. In this scenario, sending a new query every time a character is entered or deleted may not be ideal. Instead, it might be more sensible to wait for the user to enter the complete query and then update the results.
This is where useDeferredValue comes in. This hook delays the search query entered by the user and waits for the complete query. This allows the user interface to respond more quickly even while the user is typing the query.
“Let’s now recall how useDeferredValue works.”

This line retrieves a value using the useDeferredValue hook. The first parameter, deferredValue, is our deferred value, which is the query entered by the user. The second parameter is initialValue. This specifies the value to be used by the component on its initial render. If deferredValue is not immediately available, this initial value is shown.
In the example above, deferredValue is passed as the deferredValue value, which is the query entered by the user. And an empty string (”) is used as the initialValue. This means that when the component is first rendered, an empty value will be shown until background processes are completed. It will then be updated with the deferredValue value.
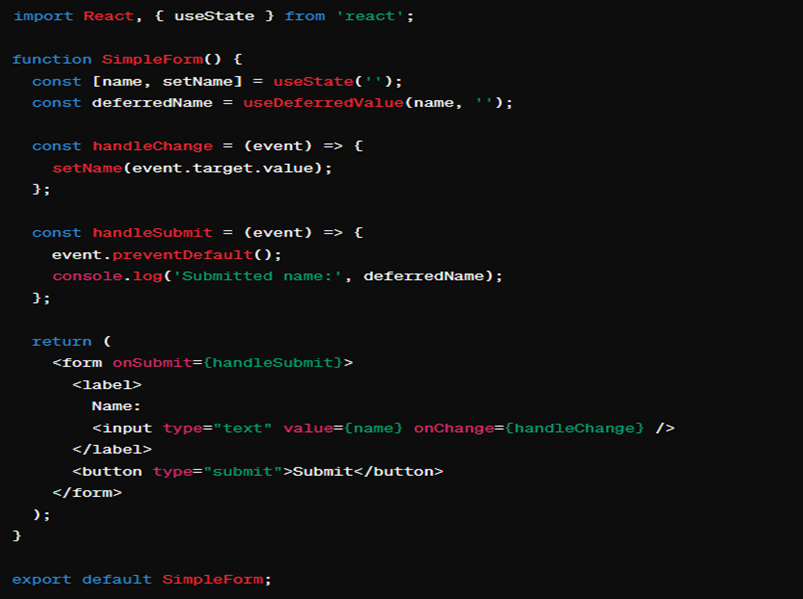
We can better understand useDeferredValue with a form example.
Let’s consider a user registration form. The user needs to enter information such as username, email, and password. However, instead of validating or sending to the server with each character input, it might be more sensible to validate when the user has entered all the information. This is where useDeferredValue comes into play.
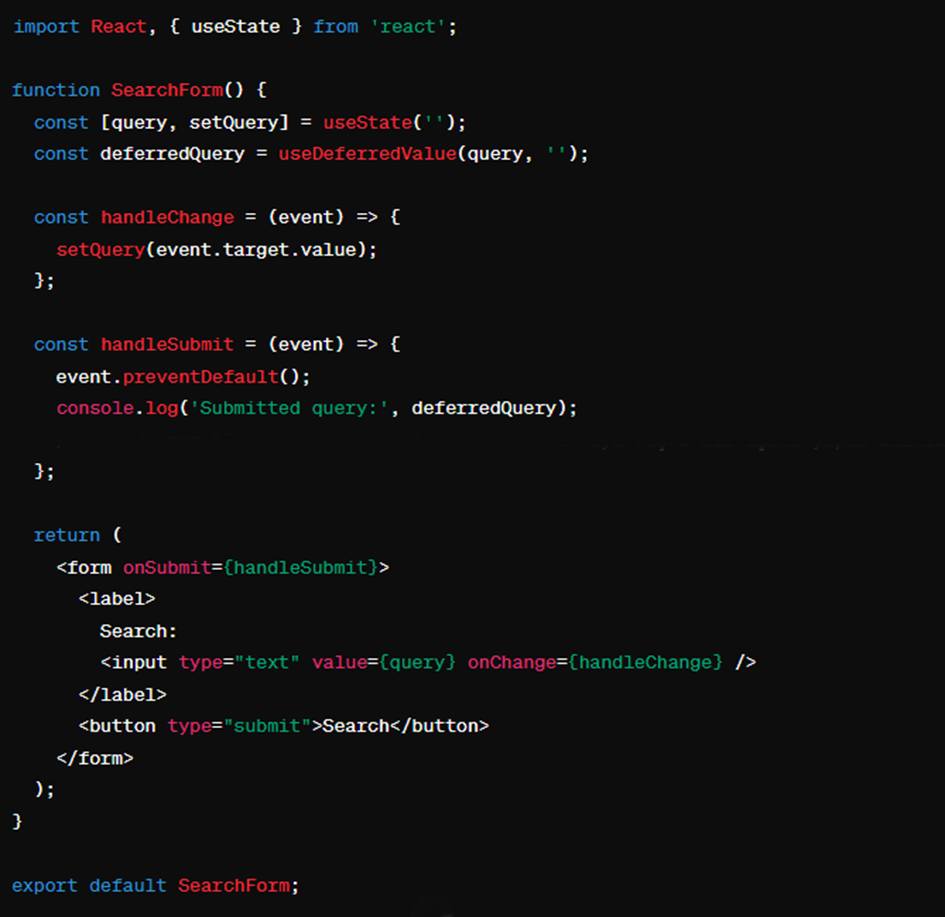
The other example below illustrates a simple search form. As the user enters a search query, the handleChange function is triggered with each character input, updating the query state. However, this update is not immediately reflected in the handleSubmit function. Instead, when the user submits the form, i.e., when the handleSubmit function is executed, the current query data (deferredQuery) is processed.
For instance, when the user searches for “React” and clicks the “Search” button, the form is submitted. And an output like “Submitted query: React” is obtained. This output indicates that the search query has been processed correctly.
In this way, rather than validating with each character input before the user completes the search query, processing can occur all at once when the user finishes entering the search query. This provides a smoother and more effective user experience.
ref as a prop
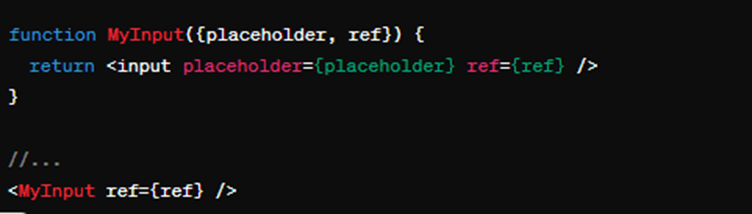
A significant improvement with React 19 is the ability to directly access the ref prop in functional components. Previously, when you wanted to access the reference to a child DOM element within a functional component, you had to use the forwardRef API. However, with this update, you can define a ref prop in the destructive props of your functional component. React takes care of the rest.
In this example, the MyInput functional component accepts props, including the ref prop. When used like <MyInput ref={ref} />, React automatically forwards the ref to the underlying <input> element. This allows you to directly access the DOM node.
This enhancement simplifies the code and eliminates the need to use forwardRef in new functional components. React also provides a code transformation tool to automatically update your existing components to use the new ref prop. Additionally, it has been stated that as this new approach becomes standard in future versions of React, the usage of forwardRef will be deprecated and eventually removed.
as a provider
In React 19, you can import <Context> as a provider instead of <Context.Provider>:
In future versions, <Context.Provider> will be deprecated.
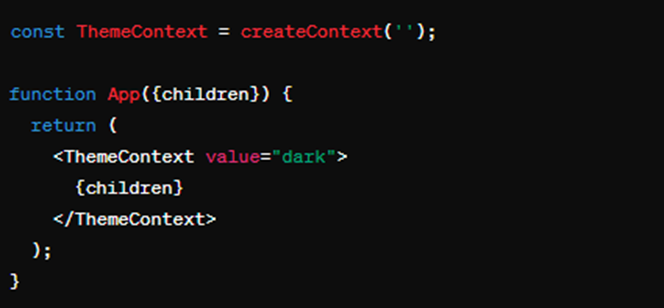
First, we create a base theme context using createContext. This theme context will store the theme information across the application and pass it down to child components.
Then, we create a component named App. This component utilizes the <ThemeContext> component. However, instead of using <ThemeContext.Provider> as usual, we use <ThemeContext>. This is a new feature in React 19.
Using <ThemeContext> allows for a shorter and more natural way to pass the context down to child components. So, you no longer need to write <ThemeContext.Provider>. You simply handle things using <ThemeContext>.
usage of Meta Tags
With React 19, we can now directly use title and meta tags in our React components.
It’s important to note that this feature wasn’t possible in React before. Previously, for such tasks, one had to use a package like react-helmet.

The og:title, og:description, and og:image meta tags are part of the Open Graph protocol. They typically represent information used in social media shares.
- og:title: This meta tag specifies the title of the share. It’s usually the same as the page’s title or related to it.
- og:description: This meta tag specifies the description of the share. It contains a brief description or summary of the share’s content.
- og:image: This meta tag specifies an image for the share. It represents the visual of the share and often makes the share more appealing.
These meta tags are used, particularly, to enhance the shareability of your website’s pages on social media. For instance, when a user shares content from your website on Facebook, Facebook can automatically populate information like title, description, and image using these meta tags. This makes the share more attractive and can reach more users.
Conclusion
React has solidified its position as a leading library for building user interfaces. It offers developers a powerful toolkit for creating dynamic and interactive web applications. With the release of React 19, several innovative features such as useActionState, useTransition, useFormStatus, useOptimistic, “use” API, useDeferredValue, ref as a prop, <Context> as a provider, and the usage of Meta Tags have emerged. These further empower developers to build more efficient, scalable, and feature-rich applications. These enhancements not only streamline development processes but also contribute to better performance, readability, and manageability of codebases.