
Important Features of GitHub Actions
Introduction
GitHub Actions play an important role in automating software development processes and optimizing CI/CD (Continuous Integration and Continuous Deployment) workflows. In this article, we will go beyond the commonly known features of GitHub Actions. We focus on its advanced functionalities that most developers have not fully explored yet. Referencing the basics from our previous GitHub Actions articles, we will discuss the advanced capabilities of this powerful tool. Also, we will explore how we can use it more efficiently. These innovative features of GitHub Actions will allow developers to optimize their workflows and manage their projects more effectively.
Table of Contents
GitHub Actions Environment Variables and Expressions
One of the most important features that increases the power of GitHub Actions is the ability to make workflows dynamic. You can achieve this using various environment variables and built-in expressions. These variables allow workflows to be more flexible and customizable. Here are some of these variables and detailed information about how you use them:
${{ github.workspace }}
Represents the path to the workspace. This refers to the directory where the source code takes place after the checkout step.
Example:

This specifies the full path to the directory where the source code takes place after the checkout step. As a result, workflows can more easily access the filesystem. And, npm install and npm run build are executed in the ${{{ github.workspace }} directory.
${{ runner.os }}
The operating system on which the work is running (for example, Linux, Windows, macOS).
Example:

This expression specifies the operating system on which the workflow runs and enables platform-specific operations.
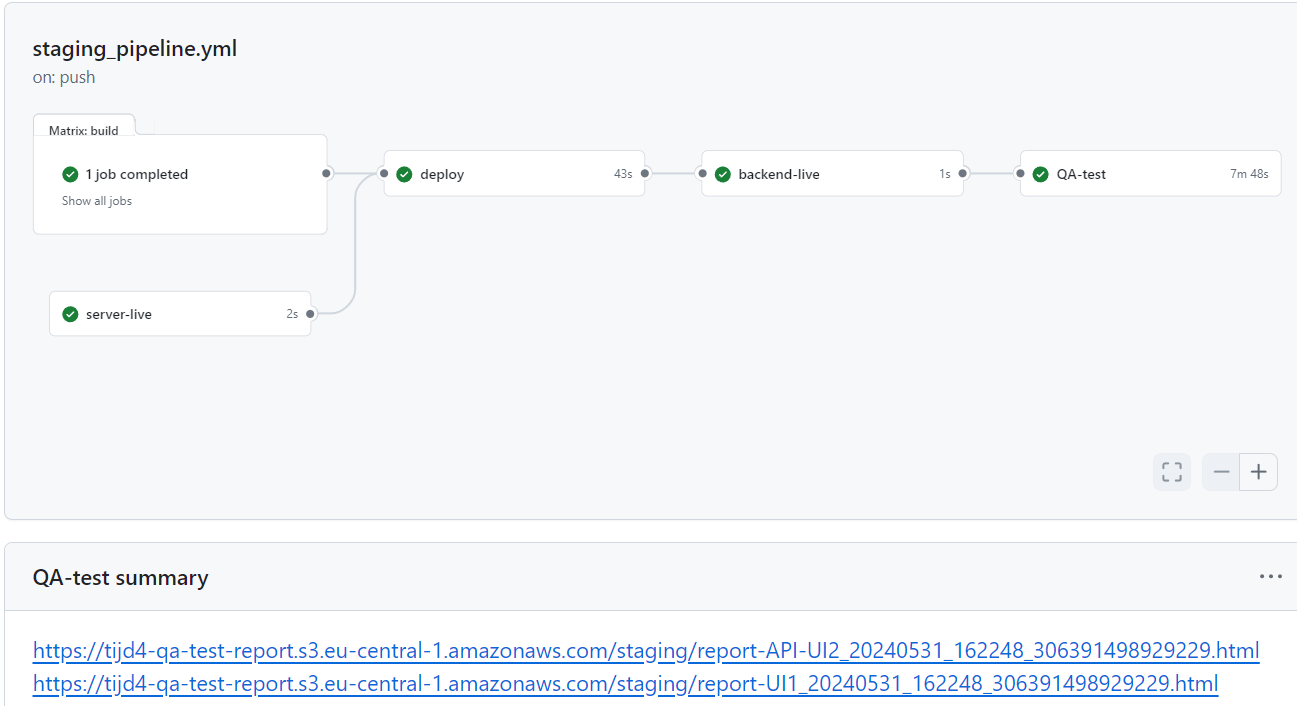
$GITHUB_STEP_SUMMARY
It helps to write a summary of the work step. This summary takes place in the GitHub Actions interface.
Example:

This variable shows the summary information of the workflow run in the GitHub Actions interface. Also, it informs the user about the status of the job. Here is an example below. It writes the text in report.txt to the GitHub actions interface.
Apart from the above examples, we can use many more environment variables and contexts and get output. There are many environment variables and contexts available. We can similarly use them to improve our workflows. So, we will direct you to the GitHub documentation for further review.
You can examine the context(s) from the link below.
https://docs.github.com/en/actions/writing-workflows/choosing-what-your-workflow-does/contexts
You can examine the environment variables from on the link below.
https://docs.github.com/en/actions/writing-workflows/choosing-what-your-workflow-does/variables
Secrets Management for GitHub Actions
GitHub Actions offers a powerful Secrets Management system to ensure the secure storage and handling of sensitive data in workflows. This feature ensures that API keys, passwords, and other confidential information are not stored in the open. As a result, it handles this information securely. Here’s what you need to know about Secrets Management in GitHub Actions and detailed information on how to use it:
What are Secret Keys (Secrets)?
Secret keys are secure and encrypted variables. You can store it in a GitHub repository and use it during workflows. These keys are only accessible by specific workflows. In addition, they are hidden in the GitHub UI, which maintains confidentiality.
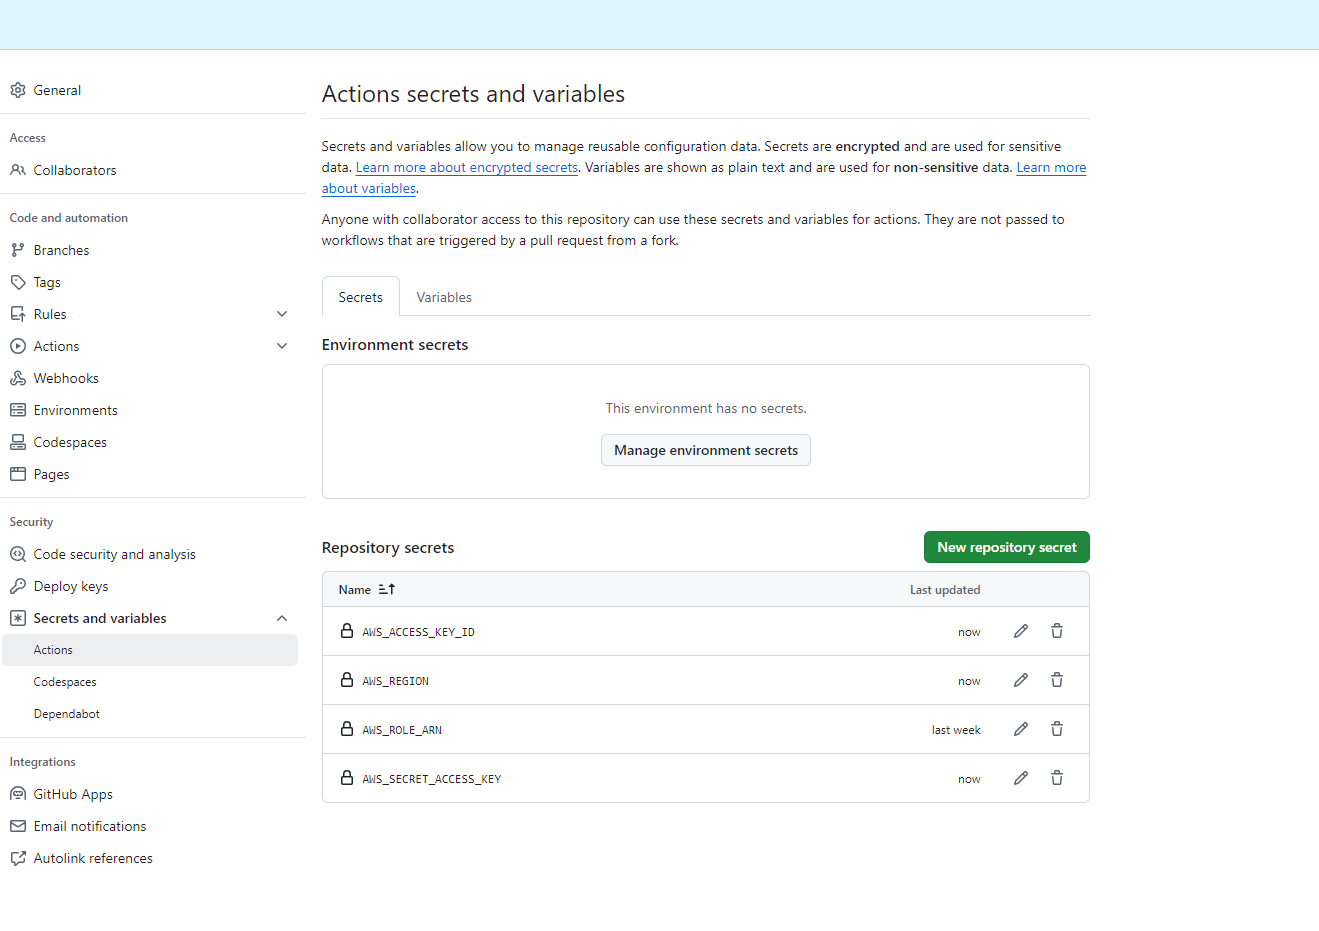
Identification of Secret Keys
You can set Secret Keys at the repository level or the organization level. Secret Keys at the repository level work only for workflows in that specific repository. On the other hand, Secret Keys at the organization level are accessible by multiple repositories within the organization.
Use of Secret Keys
To use secret keys in your GitHub Actions workflows, you can call these secret keys through the secrets container. Thus, you can use secret keys securely in workflows, and they will not be printed to their output.
Example:
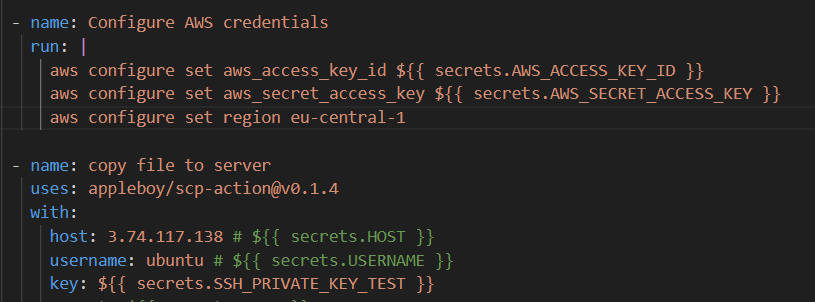
The example above shows how several secret keys take place securely within the process. This method keeps secret keys and other sensitive data from being explicitly in the workflow.
Security of Secret Keys
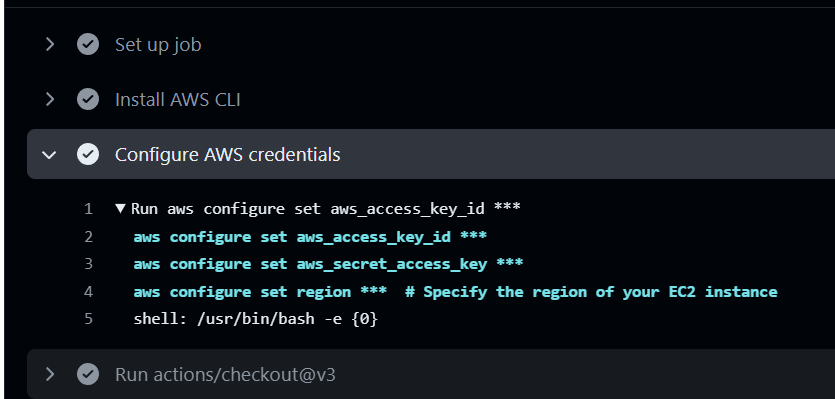
GitHub encrypts secret keys and allows only authorized workflows to access them.
In addition, GitHub Actions do not print secret keys to outputs. If included, GitHub automatically masks them. For instance, the workflows above show how GitHub masks secrets:
Concurrency Control
By default, GitHub Actions allows multiple jobs within the same workflow to run simultaneously. In addition, it supports multiple workflow runs in the same repository and the repository owner’s account. This means that multiple workflow runs, jobs, or steps can run at the same time.
GitHub Actions also allows you to control the concurrency of workflow runs. So, you can ensure that only one run, one job, or one step runs at a time in a given context. This can be useful for managing your account’s or organization’s resources effectively. For instance, it helps when running multiple workflows, jobs, or steps that could cause conflicts or use more Actions minutes and storage than expected.
GitHub Actions can run multiple workflows concurrently. Therefore, if several commits are quickly posted to a repository, each one triggers a separate workflow run, and all these runs execute at the same time.
Example:
In GitHub Actions, the Concurrency feature is configured using the concurrency switch. This switch enables workflows to run concurrently with a queue or lock mechanism.

group: buil-test
The group parameter defines the name of the concurrency group. In this example, the group name is buil-test. This means that if you define multiple jobs with the same name, GitHub Actions allows only one to run at the same time within this group.
- Group Name Example: If other jobs in your workflow use the same group: buil-test, they will not run at the same time. GitHub will hold the other one until the current job finishes.
group: ${{ github.workflow }}-${{ github.ref }}
In this commented example, the group name is created dynamically and consists of these two components. So, we can use this parameter if we want it to be dynamic. As a result, this dynamic name becomes CI Workflow-refs/heads/main. This allows the same workflow to run only once at a time for the same branch or tag.
cancel-in-progress: true
This parameter ensures that if a new workflow is triggered for the same group while an existing workflow in the concurrency group is running, the existing workflow is canceled.
For more information about Concurrency Control, you can visit the githup documentation.
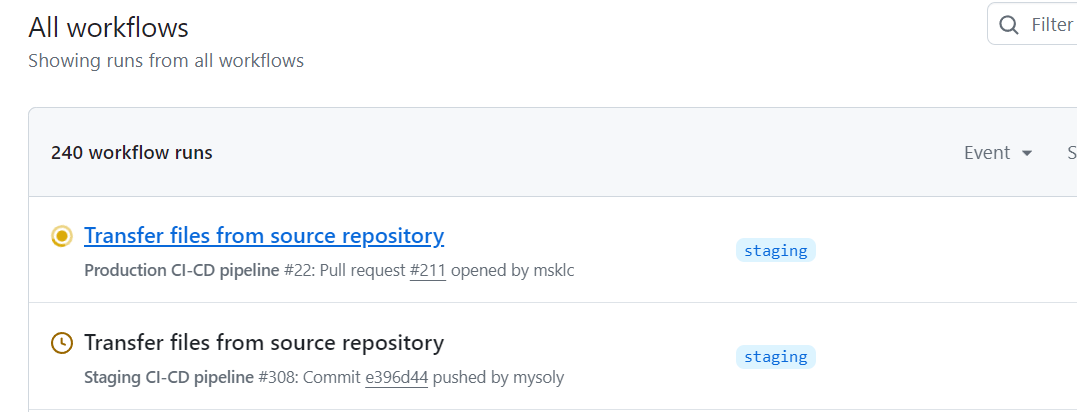
This is how we can see that when two separate workflows in Github actions are triggered simultaneously, one is running while the other is pending.
Environment Protection Rules
Environment Protection Rules is an important security feature that GitHub Actions provides to manage deployment processes in a more secure and controlled manner. These rules ensure that certain approval processes are applied, especially for deployments to production environments, and that only authorised people can perform these deployments. This plays a critical role in both securing production environments and minimising unwanted errors and issues.
What is the Environment?
In GitHub Actions, an environment specifies the configuration where an application will deploy or run. For example, you can define environments such as production, staging, and development. Each environment can have its unique settings, secrets, and approval requirements.
In deployment processes, it is important to always perform the latest checks and approvals, especially when deploying to critical production environments. Media protection rules automate this process, preventing errors and unintended deployments. These rules ensure that:
- Security and Compliance: Ensures that only authorized persons can access and modify environments with sensitive data.
- Risk Mitigation: Enables early detection and prevention of potential errors by controlling changes to production environments.
- Audit and Traceability: Provides a comprehensive audit trail to track who made each deployment and when.
How do Ambient Protection Rules Work?
Environment protection rules operate under certain conditions in GitHub Actions workflows and have the following key features:
- Required Approvals
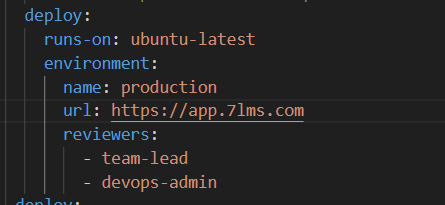
For a workflow to deploy to a specific environment, it requires the approval of predefined authorities. This approval process ensures that a second set of eyes or a more senior manager reviews critical deployments.
Example:
In the above workflow, team-lead and devops-admin users must approve before deploying to the production environment.
- Time Restrictions (Wait Timer)
You can add timers that require a certain amount of time to pass. This prevents rushed deployments and allows the deployment to be re-evaluated after a certain amount of time has elapsed.
A time constraint can ensure that a given deployment waits at least 30 minutes so that other team members can review it during that time.
Conditional Workflows (if Switch)
In GitHub Actions workflows, you use the if switch to control whether a step runs or skips based on certain conditions. This feature makes workflows more flexible and avoids unnecessary operations. Also, it optimizes processing time and resource usage.
Basic Use of the if Switch
When you want a workflow step to run only under certain conditions, you can use the if switch. You can define these conditions using variables, step results, or custom expressions provided by GitHub.
Example:
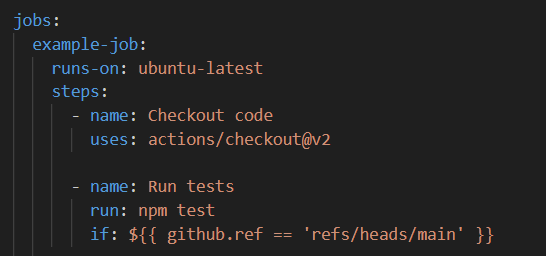
In the example above, GitHub Actions will execute the Run tests step only if the main branch is active. Otherwise, GitHub Actions will skip this step.
Let’s give examples of commonly used Condition Statements:
Determines whether a step will be executed according to whether the previous steps were successful or not.
a. if: ${{ success() }}
This condition ensures that this step runs if the previous steps of the workflow were successful. If the previous step failed, this step will not run because of the if:{{{ success() }} condition.
b. if: ${{ failure() }}
This condition ensures that the current step runs if the previous steps fail.
c. if: ${{ always() }}
It ensures that other steps work according to the overall success or failure of a job. So, it happens regardless of whether the tests are successful or not.
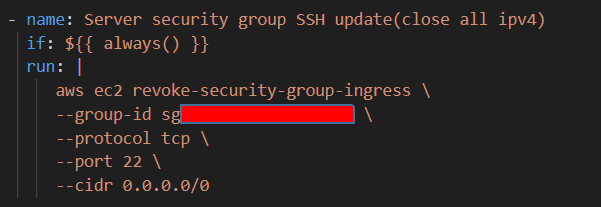
It works regardless of whether the previous steps were successful or not.
As a result, by using this key, you can define the steps that should run under certain conditions and make your workflows more efficient and flexible.
Example:
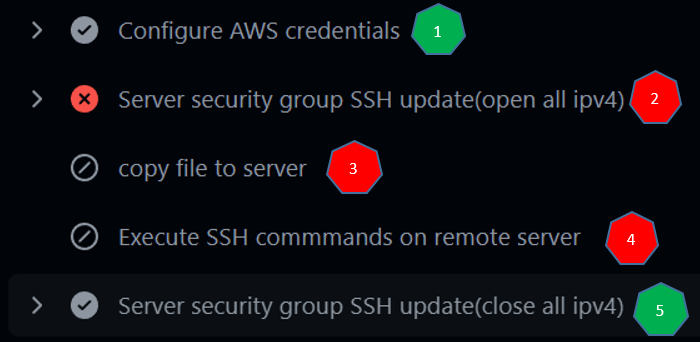
Looking at the workflow steps above, the first step is successful, but step 2 fails. Normally, after receiving an error, all steps stop and the workflow must end. So if a step fails, if there is no condition in the other steps, no step will work. As you can see, steps 3 and 4 did not work at all, but step 5 worked because of the if: ${{{ always() }} condition.
Advantages of if switch
- Resource Saving: Saves processing time and resources by preventing unnecessary steps from running.
- Flexibility: It adds flexibility to your workflows by running different workflow steps under different conditions.
- Error Management: It provides better error management in the workflow by creating steps that will only work under certain conditions.
Job-level conditions can also be used to set conditions based on the overall success or failure of a job. In other words, if conditions can be used both at the job level and at the step level.
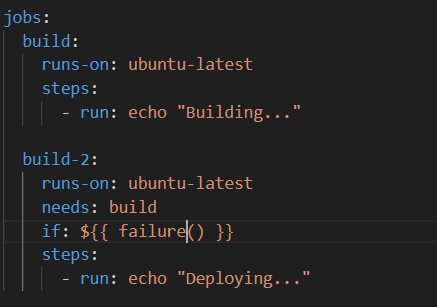
By the way, ‘build-2’ job will only run when the ‘build’ job is not running.
For more information on Conditional Workflows (if Switch), see the GitHub documentation.
Caching Workflow Dependencies
In GitHub Actions, caching is a method to make your workflows run faster. Storing data from previous actions or phases and reusing it later increases the efficiency of workflows and shortens their duration. This is especially useful for time-consuming tasks such as installing or compiling dependencies.
Cache stores data between steps of a workflow. The GitHub Actions cache stores data via keys that you specify in each workflow, and these keys determine when the cache is used or not used during the workflow.
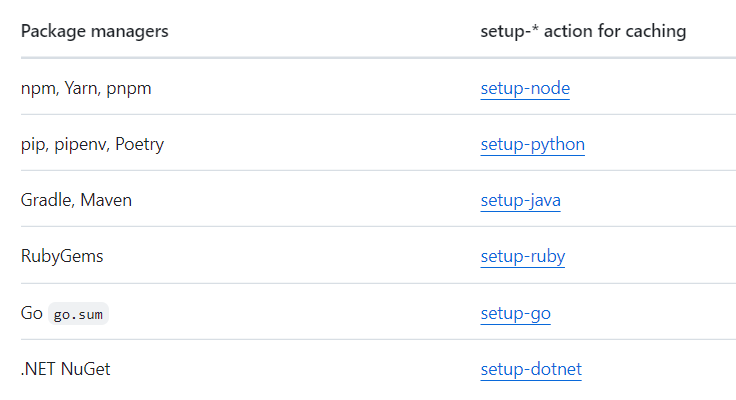
Alternatively, if you cache the package managers listed below, using the corresponding setup-* actions requires minimal configuration and creates and restores dependency caches for you.
Warning : Note the following when using caching with GitHub Actions:
- We recommend that you do not store any sensitive information in the cache. For example, sensitive information might include access tokens or login credentials in a file in the cache path. In addition, command line interface (CLI) programs can save docker logon credentials in a configuration file. Anyone with read access can create a pull request on a repository and access the contents of a cache. Forks of a repository can also create pull requests on the base branch and access caches on the base branch.
- When using self-hosted executors, caches from workflow runs are stored in GitHub-owned cloud storage. You can use a customer-owned storage solution only with GitHub Enterprise Server.
Using the Cache action:
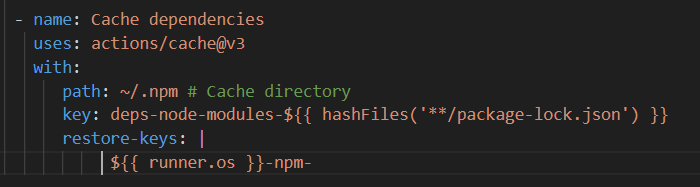
The ‘path’ property takes the value ‘~/.npm’, which specifies the path to the directory in the cache where the project’s npm dependencies will be stored.
‘key’ is the key to identify the cache. In the example below, a key is created using runner.os (operating system) and the hash value of the package-lock.json file. This cache key keeps track of changes to the project’s ‘package-lock.json’ file, and if this file changes, the cache key also changes. This way, when a change is made to the project ‘package-lock.json’ file, the npm dependencies in the cache are also updated and the project is recompiled.
Use the “restore-keys” key to try to restore the cache with more general keys if the specific key is not found. This approach attempts to find similar existing caches.
The expression ‘hashFiles(’**/package-lock.json‘)’ is a function in the workflow that takes the contents of your project’s package-lock.json file and hashes it. This hash is like a unique ID number for the current state of the file and acts as part of the cache key.
In other words, every change to the package-lock.json file leads to a new cache key, which helps keep dependencies up to date. Even a small change to your file can trigger this process, refreshing the cache and forcing the project to recompile.
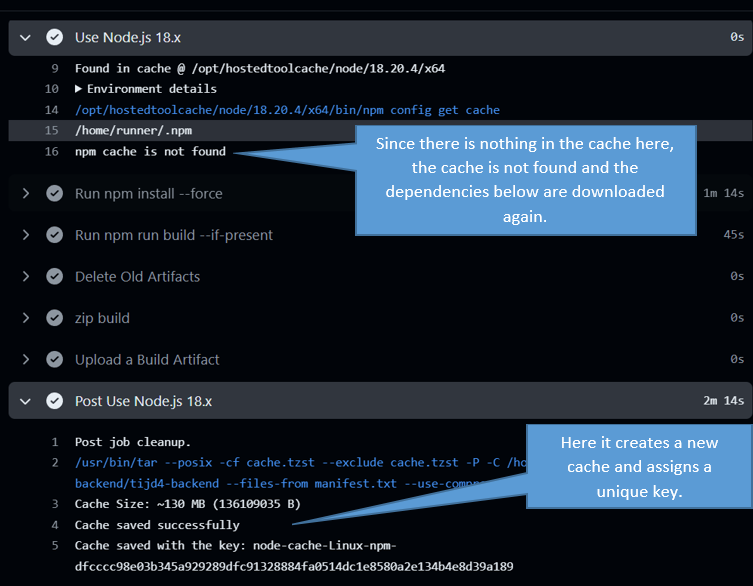
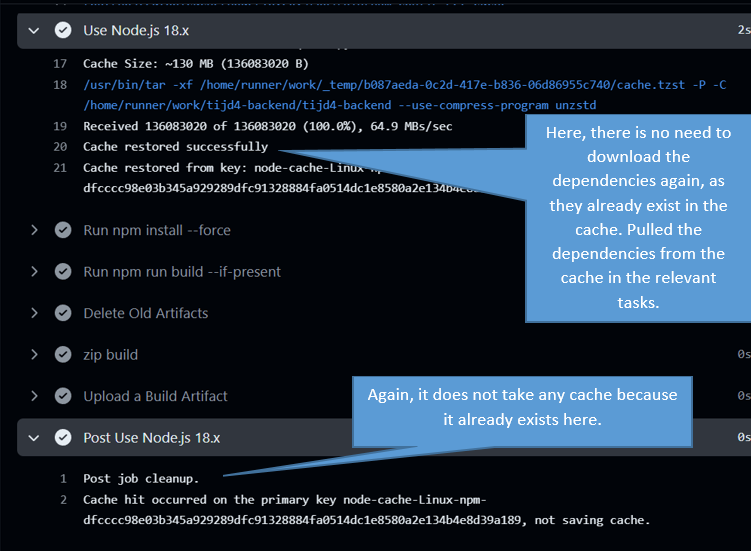
Here we show the output of the workflows we run using setup-* actions in the github actions interface.
For more information on this topic, see the github documentation.
https://docs.github.com/en/actions/writing-workflows/choosing-what-your-workflow-does/caching-dependencies-to-speed-up-workflows
Conclusion
GitHub Actions stands out as a powerful automation platform that offers flexibility and efficiency in modern software development processes. From Secrets Management to Conditional Workflows, from Concurrency Control to Environment Protection Rules, it offers a wide range of features that increase the security, speed and sustainability of software projects. As we’ve discussed in this article, effectively using the tools and functions by GitHub Actions not only automates your workflows, but also enables you to move your projects forward. Whether you are just starting out or an experienced user, GitHub Actions will help you build more powerful and optimized workflows at every stage.
Sources:
- GitHub Docs (https://docs.github.com/en/actions)
Mysoly | Your partner in digital!