CI/CD with GitHub Actions: Step-by-Step Workflow
Introduction
In the previous article on GitHub Actions, we provided an overview of CI/CD and specifically discussed GitHub Actions as a tool for CI/CD and its benefits. Now, we will explore more on how to use GitHub actions, which parameters are useful, and what are its capabilities. We will further customize it and share a step-by-step workflow in this article, without excessive detail. You can already get much more detailed information from the GitHub Actions documentation. Naturally, a platform with a large community has very much documentation. Let’s look at CI/CD with GitHub Actions!
What is Workflow?
A workflow is an automated process that consists of one or more jobs. And an event can trigger a workflow. We can use workflows published openly on the GitHub Actions Marketplace or create our own workflows. These workflows will help us a lot. Of course, we will also need to write custom workflows for our project.
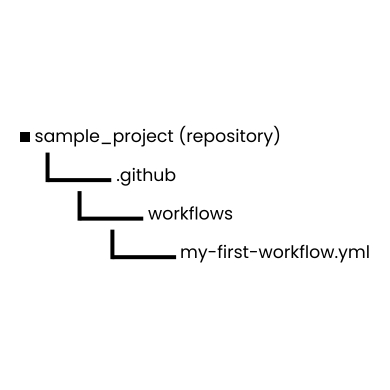
Workflows are defined in the .github/workflows directory in a repository, and a repository can have workflows, each of which can perform a different set of tasks. For example, you can have one workflow to build and test pull requests, another workflow to deploy your application every time a release is created, and another workflow that adds a label every time someone opens a new issue.
As a result, we will need to create a directory like .github/workflows and create a file with the “.yml” extension under this directory. (If you want to use an action that is already in the GitHub Marketplace on this repo for the first time without creating such a directory, these directories will be created automatically in the first configure process.)
Basic Components of Workflow
1. Events: Triggering Your Automation
An event triggers a workflow run and is a specific activity in a repository. For example, GitHub activity initiates when someone creates a pull request, opens an issue, or pushes a commit to a repository. For a comprehensive list of events that can trigger workflows, refer to this for more detail!
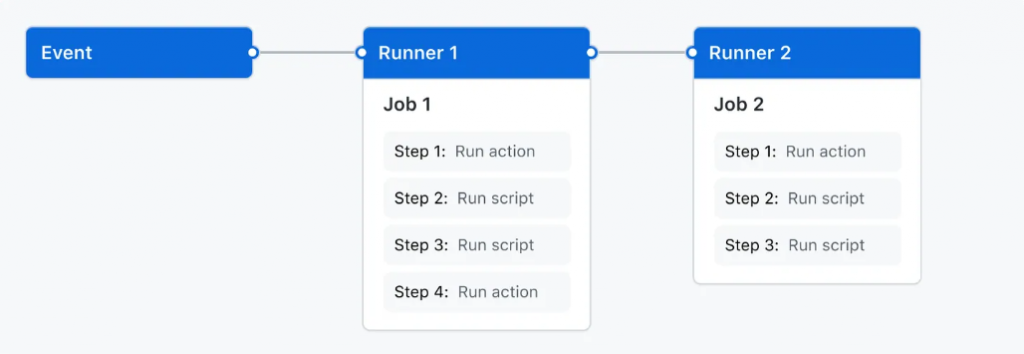
2. Runners: Powering Your CI/CD Pipeline
Servers run when workflows trigger them. They execute the actions of a job and report the results to GitHub. Each runner can handle a single job at the same time.
3. Action: Crafting Effective GitHub Actions
An action on the GitHub Actions platform is a specialized application that performs a complex but frequently repeated task. It can reduce the amount of repetitive code you write in your workflow files. Additionally, it can pull your Git repository from GitHub and configure the right toolchain for your build environment. Moreover, it establishes authentication for your cloud provider.
Workflow Parameters
Now let’s talk about what parameters a workflow generally contains and briefly define what they do.
• name:
Specify the name of a workflow, job, or step; while not mandatory, it enhances readability when viewing or monitoring your GitHub Actions workflow.
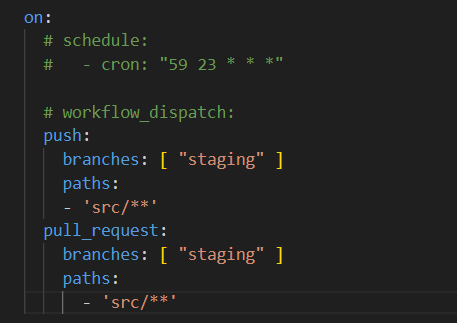
• on:
Defining the events that will trigger the workflow; for instance, triggering each “push” or “pull_request” request to specific branches is possible.
In the image below, the workflow will work in every “push” and “pull_request” event. But here we have the possibility to apply more limits. We can mark the branch and the directory we want under these branches. Exactly what we want to do here is to trigger the workflow due to the change made in the src directory under the staging branch and make it run on every “push” and “pull_request” event.
• jobs:
A job is a set of steps in a workflow that is executed on the same runner. Each step is either a shell script that will be executed or an action that will be run. Steps are executed in order and are dependent on each other. Since each step is executed on the same runner, you can share data from one step to another. For example, you can have a step that builds your application followed by a step that tests the application that was built.
Configuring a job’s dependencies with other jobs; by default, jobs have no dependencies and run in parallel with each other. When a job takes a dependency on another job, it will wait for the dependent job to complete before it can run.
For example, you may have multiple build jobs for different architectures that have no dependencies, and a packaging job that is dependent on those jobs. The build jobs will run in parallel, and when they have all completed successfully, the packaging job will run.
• steps:
Defining the individual tasks within a job; essentially, jobs consist of steps, and each step can be a command, an action, or a script. See Figure 1.
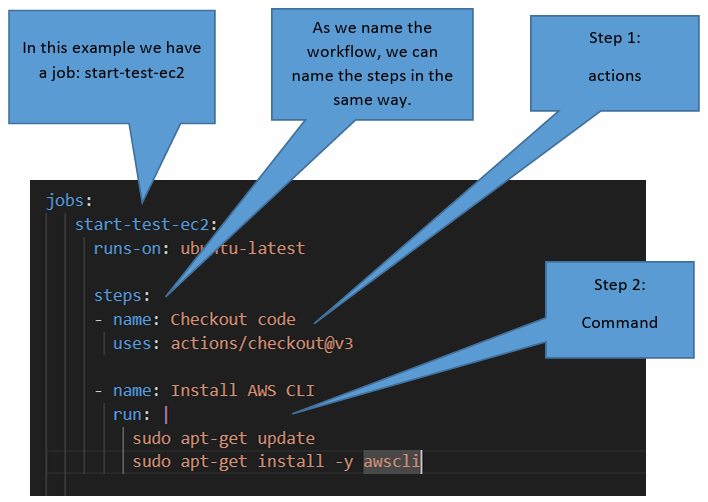
• runs-on:
Specifying where a job will run; for instance, it can be set to o “ubuntu-latest”, “Windows-latest” or “macos-latest”.

• env:
Allowing us to define and set environment variables, these variables can be accessed during the workflow run and in subsequent steps.
• with:
Configuring an action or step, it sets specific parameters for actions or steps.
• timeout-minutes:
This sets the maximum runtime for a job. If the job exceeds this time, it will be canceled.
For more parameters used in Workflow, see the documents.
Using a Workflow Ready in Marketplace: Step-by-Step Example
Before we create our own workflows, let’s look at how to create and use workflows that we can use ready-to-use in the GitHub Marketplace.
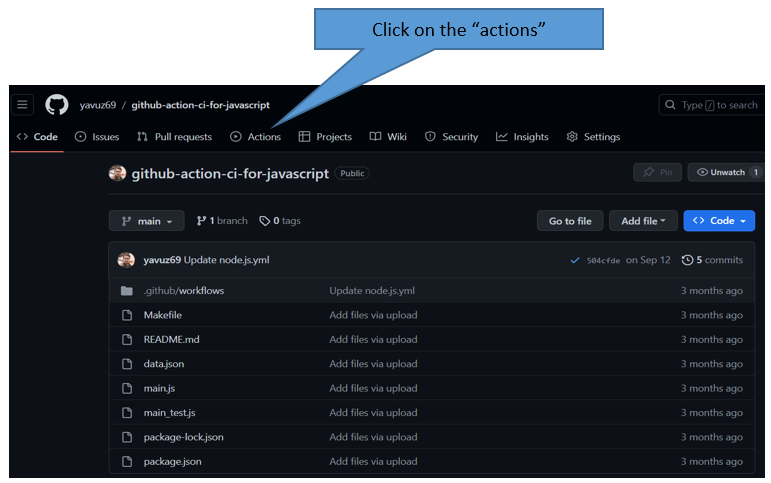
Step 1:
Navigate to the repository where you want to apply the GitHub Actions.
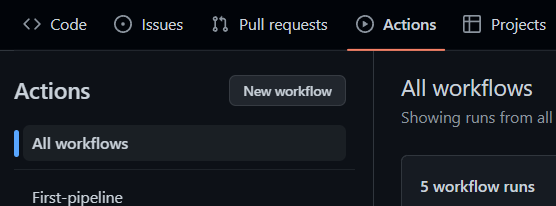
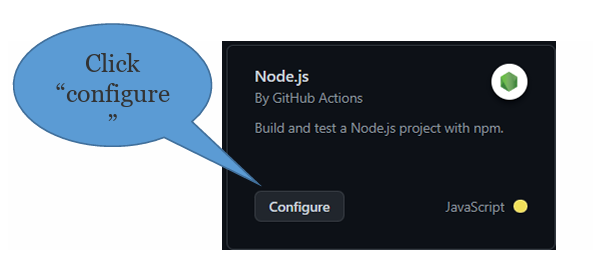
Step 2:
Step 3:
If you choose not to create a workflow, you will discover a marketplace where you can explore the workflow template of your preference. For those who have already established a workflow, accessing this page is possible through the “new workflow” section under action.
Let’s have a look at the predefined code that present inside the action.
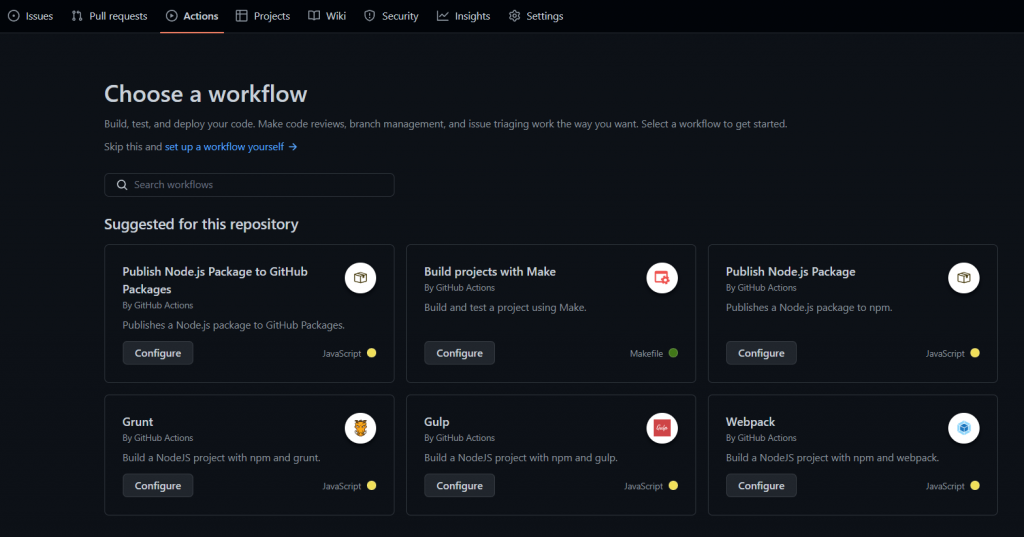
In the marketplace, you can search for the workflows you need in the search workflows section. It will make appropriate redirections according to the registered source codes already in the GitHub repo.
Step 4:
In this example, we are selecting the ‘node.js’ template, created officially by the ‘GitHub Actions’ itself.
Step 5:
After the process we did in step 4, as we mentioned above, it creates a yaml file under .github/workflows. Of course, we can change the name and content and customize it according to ourselves.
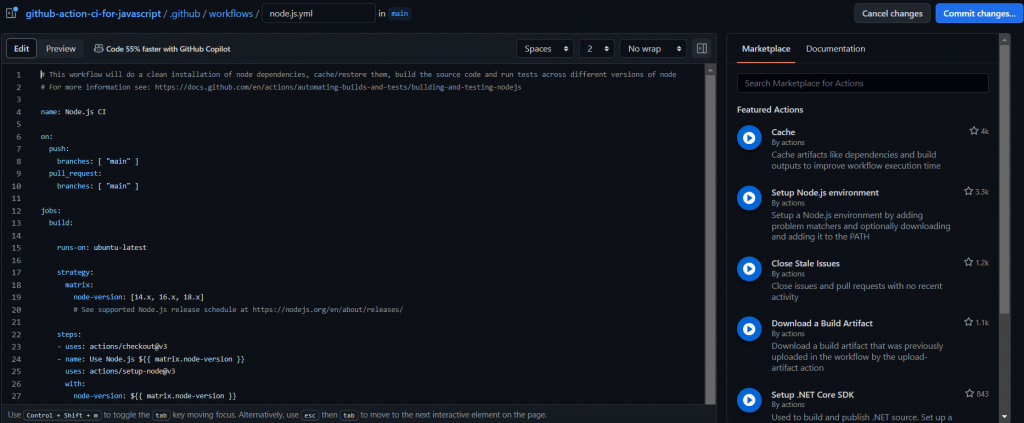
On the right side of the image, there are “Marketplace” and “Documentation” sections. In the Marketplace tab, you will find sample workflow steps. The Documentation section provides important information on the subject. You can refer to it when needed. GitHub docs help us a lot.
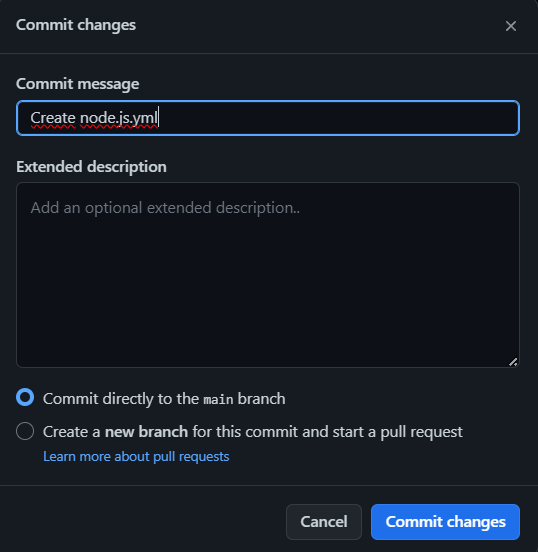
Step 6:
Save this new change to the repository. We can commit it directly to the main repository. Also, we can create a new branch for it and start a new pull request.
Step 7:
The ‘node.js’ GitHub Actions has now been added to the repository.
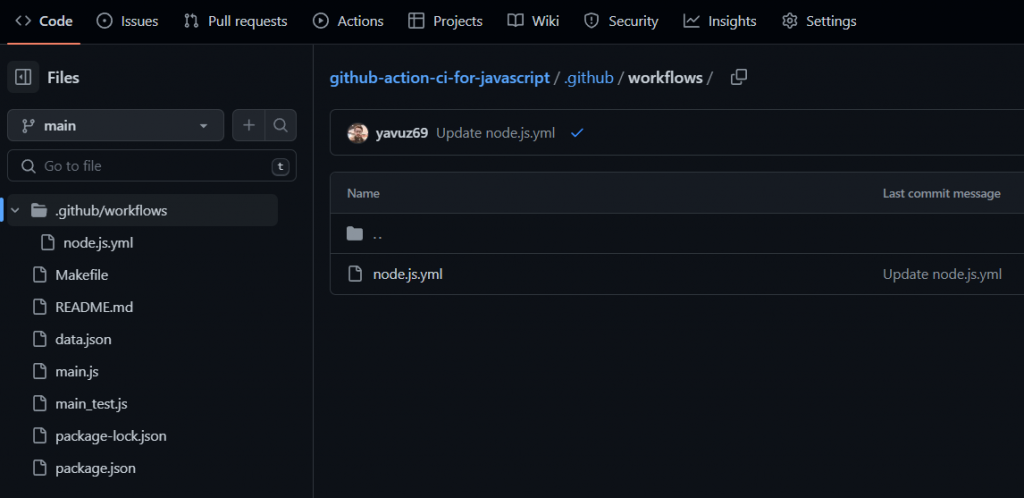
Now that it is added to our repo, this will work according to the trigger we added to the workflow. You should go to the “Actions” section to see this.
Building a Robust CI/CD Workflow: Detailed Description
Finally, we would like to share a workflow in our repo and explain it.
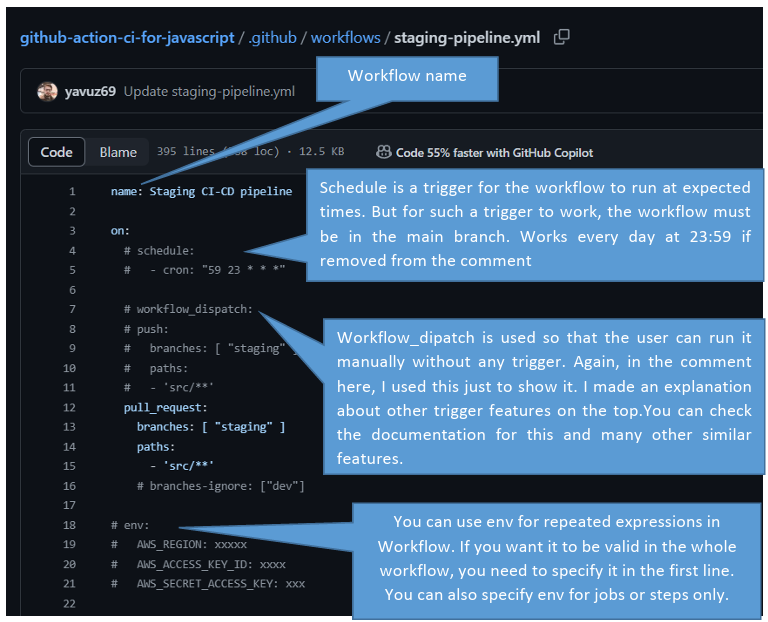
In this step, we gave a name to our workflow and then we showed the triggering operations with on. As we mentioned above, there are many different methods, we recommend you examine the GitHub docs about it. There are also many parameters like name and on. For example, more than one workflow was triggered and run at a time. Specific to this situation, you can provide features such as waiting for the next workflow with the “concurrency” component. And more…
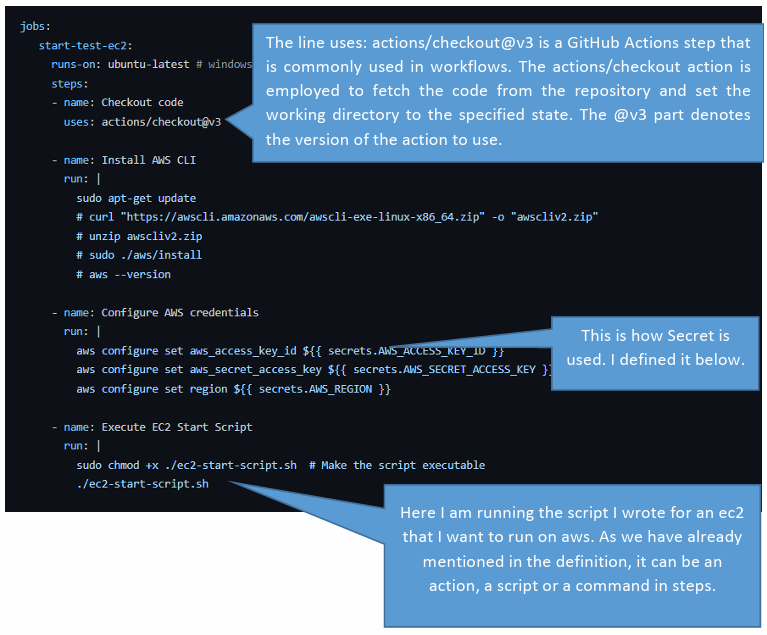
First job! We use the “ubuntu-latest” runner. Then we specify steps. We have 4 steps. Our goal here is to run a server on AWS. If we want, we can completely rebuild a server, or we can start a stopped server. In addition, if we have a server that is always running, we can check if it is running. It all depends on our project.
Secrets: Securing Your CI/CD Workflow
Secrets are variables that you create in an organization, repository, or repository environment. The secrets that you create are available to use in GitHub Actions workflows. GitHub Actions can only read a secret if you explicitly include the secret in a workflow.
For secrets stored at the environment level, you can enable required reviewers to control access to the secrets. A workflow job cannot access environment secrets until approval is granted by the required approvers.
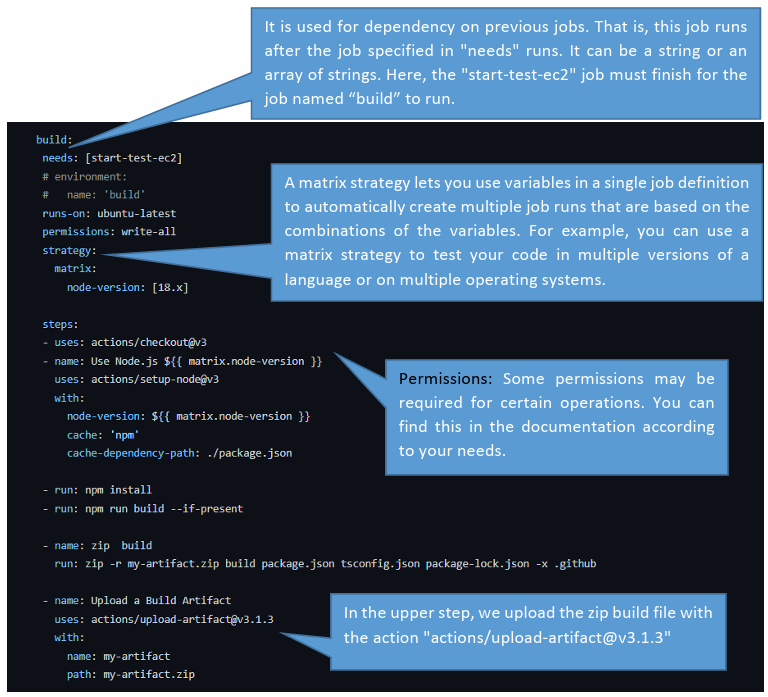
Second job! Here we build the files in our repository. This is one of the best benefits of GitHub Actions, so we don’t send our source code to the server at all. This is a workflow for a node.js application.
First, we use the ready-made “actios/setup-node@v3” action available on the marketplace. You can think of it as preparing a runner with node.js installed for us. If we were to take this action on any other server, we would need to install node.js and the necessary dependencies, but here this action takes care of us.
In “strategy” we specify which node.js version we should use. Next, we get the build with npm install and npm run build. After that step, we ziploc the build file we received, because the large file size slows down the process considerably. Finally, we upload this zip file to use it in later jobs and deploy it to the server.

Build
Next job! In this “build” job, after we build the code in our repository, we deploy it to the server. In the previous job, we took the build, zipped it, and uploaded it. Here we download the zip file first and then send it to the relevant directory on the server.
Therefore we need to have information about the server and introduce it to the runner running here. We have already explained this in the image. Then we connect to the server and enter the necessary commands to run the application in the required directories. We explained which action we took within the image.
After having the necessary permissions and authorizations, you have seen that many things can be done with GitHub Actions. Of course, this is the backend repo of our application. If the frontend part of the application has been built and thrown to the server before, our application will run after this job. If our application is now running smoothly, you can do your QA tests after this job by creating a job.
You can find the necessary actions for this in the Marketplace. The important thing is to create and understand the process.
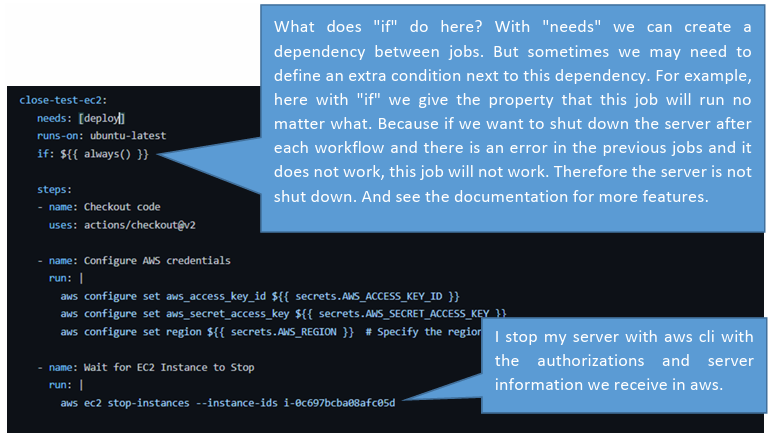
Stop
Final task! Once all operations have been completed successfully, the server will be stopped automatically, consolidating all manual tasks into a single step.
The only requirement for this workflow to function properly is the trigger defined with the ‘on’ component. While it may be challenging to prepare these steps for your initial project, subsequent projects will only require updates to the repository and server information.
You are responsible for developing the workflow for your project. The information provided in this article is at a basic level, but it should be sufficient to create a CI/CD process.
Conclusion
In conclusion, mastering CI/CD with GitHub Actions is not merely a technical skill but a transformative approach to software development. The understanding of workflows, events, runners, and actions serves as the foundation, enabling developers to orchestrate seamless and efficient automation. As we’ve explored the intricacies of these components, it becomes evident that the true power lies in their collective integration, allowing for the continuous integration and deployment of code with precision and speed. Moreover, the inclusion of secrets management adds an extra layer of security, ensuring that sensitive information remains confidential throughout the CI/CD pipeline.
Both in the 7-step example and the last example with extensive explanation, we witnessed how these principles come together in a real-world scenario, offering a practical roadmap for developers seeking to implement robust CI/CD workflows in their projects.
GitHub Actions, with its versatility and customization options, empowers developers to not only streamline their development processes but also to adapt and scale as projects evolve. In essence, embracing CI/CD with GitHub Actions marks a paradigm shift in the way software is conceived, developed, and delivered—a shift that not only accelerates development cycles but also enhances the overall reliability and quality of software products. As technology continues to advance, the insights gained from this guide position developers to navigate the ever-changing landscape of modern software development with confidence and agility.
If you want to use a CI/CD tool and take advantage of the opportunity to run the whole process on a single platform, feel free to investigate GitHub Actions. Happy learning.
Note: Some sections are quoted from Github Docs.
Mysoly | Your partner in digital!